Using Remix IDE for Deploying Smart Contracts on BSC
In this tutorial, we provide guidelines on how to create, compile, and deploy a simple Hello World smart contract on BSC using the Remix IDE.
Pre-requisites
There is no need for any local environment settings for deploying solidity smart contracts on BSC using the Remix IDE.
All you require is a browser-based Web3 wallet (e.g. MetaMask) to interact with the BSC Testnet and deployed contracts. If you are already using MetaMask, it is recommended to create a new account for testing with Replit. You can do this from the account menu, which appears when you click on the account avatar in the top right corner of MetaMask interface.
You must set up all of the following Pre-requisites to be able to deploy your solidity smart contract on BSC:
Setting Up Remix IDE
- Remix is an online IDE to develop smart contracts.
- You need to choose Solidity Compiler, Choose the appropriate compiler version. We used 0.8.15 for this tutorial.

Writing the Smart Contract
- Create a new file, name it
HelloWorld.sol, and copy the contract code given below
// SPDX-License-Identifier: MIT
pragma solidity ^0.8.15;
contract HelloWorld {
    function sayHelloWorld() public pure returns (string memory) {
        return "Hello World";
    }
}
The first line, pragma solidity ^0.8.15 specifies that the source code is for a Solidity version greater than 0.8.15. Pragmas are common instructions for compilers about how to treat the source code (e.g., pragma once).
A contract in the sense of Solidity is a collection of code (its functions) and data (its state) that resides at a specific address on the Ethereum blockchain. Learn more about the constructor and memory in the docs.
Compile Smart Contract
Step1: Click button to switch to compile page.
Step2: Select the appropriate compiler version, 0.8.15 in our case.
Step3: Enable "Auto compile" and "Optimization" from Advanced Configurations,
Step4: Select "HelloWorld" from the contract drop-down menu.
Step5: Click "ABI" to copy the contract ABI and save it.

Configure MetaMask and Fund Your Account
Now, We have to deploy our smart contract on BNB Smart Chain Network. For that, we have to connect to Web3 world, this can be done by many services like MetaMask, Brave, Portis etc. We will be using MetaMask. Please follow this tutorial to setup a Metamask Account for configuring the MetaMask wallet to use with BSC.
Open Metamask and select Custom RPC from the networks dropdown
Go to setting page

- Add a new network

Testnet
- RPC URLs
- ChainID: 97
- Symbol: BNB
- Block Explorer: https://testnet.bscscan.com
Mainnet
- RPC URLs
- ChainID: 56
- Symbol: BNB
- Block Explorer: https://bscscan.com
Go ahead and click save
Copy your address from Metamask
Head over to Faucet and request test BNB
Deploy Smart Contract
Follow the following steps to deploy the HelloWorld smart contract on the BNB Smart Chain Testnet.

- Step1: Navigate to the Deployment Page.
- Step2: Select Injected Provider in the Environment dropdown
- Step3: Confirm the Connection Request on the MetaMask notification.
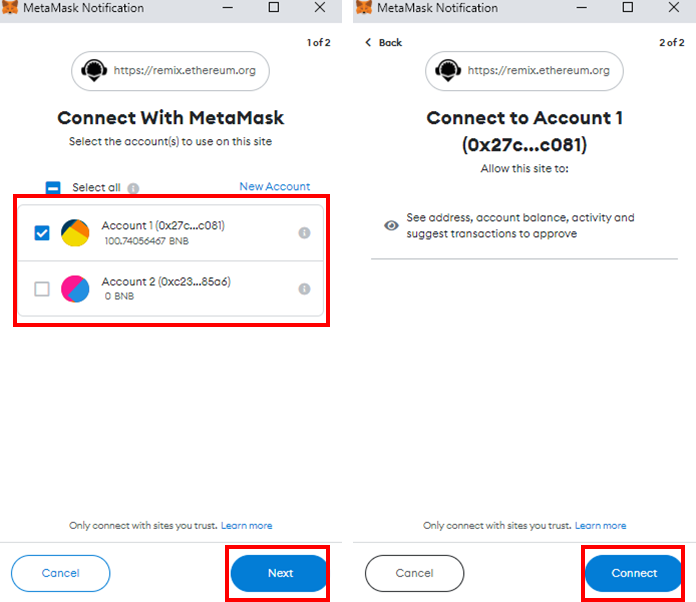
- Step4: Once Metamask is connected to Remix, click on the "Deploy" button which would generate another metamask popup that requires transaction confirmation.

Congratulations! You have successfully deployed a simple Smart Contract on the BSC Testnet. Now you can interact with the Smart Contract. Check the deployment status here: https://testnet.bscscan.com/
Verify the deployed contract on BscScan
The first and foremost step is to flatten the solidity contract into a single file to be able to get it verified on BscScan.
Flatten the Smart Contract Code
- Copy and Paste your smart contract into a local file on your system named as
HelloWorld.sol. - Install Truffle Flattener by running the command
npm install truffle-flatteneron your terminal or command prompt. - Flatten the contract by running the command in the
npx truffle-flattener HelloWorld.sol > FlatHelloWorld.solcontracts directory - Clean up the licensing information.
- The flattened contract will have the same licensing note imported from each of the files.
- Multiple licensing notes in one file break the BscScan verification, so you have to leave one licensing note for the entirety of the flattened contract.
- The easiest way to clean up is to search for the SPDX mentions in the file and remove all of them except for the very first one.
Using Flattened Code to Verify
At this point, you have your flattened and cleaned-up contract ready for the BscScan verification.
- Go to BscScan Testnet.
- Find your deployed contract by searching it using its address.
- On the main page of BscScan, on the header click Misc > Verify Contract.
- In Compiler Type, select Solidity (Single file).
- In Compiler Version, select v0.8.15. This is the version this tutorial used to compile the contract.
- In Open Source License Type, select MIT License (MIT).
- Click Continue.
- Keep the Optimization option set to No as Remix does not use optimization by default.
- Paste the entirety of your flattened .sol contract in the Enter the Solidity Contract Code below field.
- Click Verify and Publish.
- BscScan will take a few seconds to compile your contract, verify, and publish it.
Conclusion
This tutorial guided you through the basics of creating and deploying a simple smart contract using the Remix IDE and MetaMask Web Wallet. It also provides step-by-step guide on how to verify and publish your deployed smart contract. This tutorial uses testnet, however, the exact same instructions and sequence will work on the mainnet as well.